

You probably fall into one of two camps: people who haven’t the foggiest idea what pressing Command-Shift-3 or Command-Shift-4 do on the Mac, and those who use those keyboard shortcuts regularly to take screenshots. Either way, macOS 10.14 Mojave makes it easier than ever to create a still image of what’s on your Mac’s screen and to record a video of actions you take on the screen. (And don’t worry, the old shortcuts still work just as they always have.)
For those who aren’t screenshot takers, why would you want to? The big reason is to share something you’re looking at, perhaps to send a friend a map to where in a park you want to meet or to tell tech support about the error dialog you keep getting. And a screen recording is a great way to show an employee how to perform a task without having to write it all up.
To start with Mojave’s new tools, press Command-Shift-5 and look at the controls that appear in a floating control bar. (If you open it accidentally, click the X button or press Escape to close it.)
![]()
Screenshots
The first three buttons help you take screenshots, with a few welcome enhancements over the Mac’s longstanding screenshot capabilities. The resulting screenshot will always be in PNG format.
- Capture Entire Screen: Click the first button and then click anywhere to make a screenshot of the entire screen. If you have a second monitor attached to your Mac, you can click anywhere on that screen to capture it instead.
- Capture Selected Window: To focus on a particular window, click the second button and then click the camera pointer on the desired window. This also works with dialogs and menus; make sure they’re visible before invoking the screenshot controls. A tip: press the Option key when clicking the camera pointer to capture the object without its drop shadow.
- Capture Selected Portion: What if neither of those is quite right? Click the third button, drag out, position, and resize the selection rectangle over the spot you want, and click Capture on the control bar. Note how the rectangle shows the dimensions of the image it will create as you resize—that can be useful.
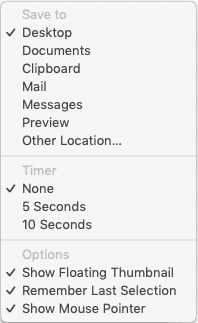
There’s also an Options menu on the control bar. Click it to choose which folder or app should receive the screenshot and if you need a 5- or 10-second timer to get the screen looking right first. You can also choose to show a floating thumbnail of the screenshot in the lower-right corner of the screen for quick markup or trashing, remember the size and location of the selection rectangle, and show the pointer in the screenshot.
Screen Recordings
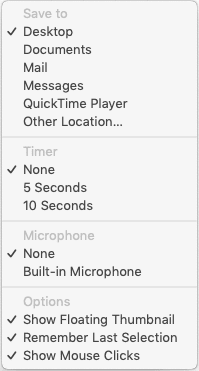
The fourth and fifth buttons are for creating screen recordings, and they’re similar to the screen capture choices. When you select one of them, the contents of the Options menu change, and the Capture button changes to Record. The movie will always be a QuickTime movie using the H.264 codec.
![]()
- Record Entire Screen: Click the fourth button and then Record to start recording actions on the entire screen.
- Record Selected Portion: The problem with recording the entire screen is that the resulting file can get big. To focus on a small area of the screen, click the fifth button. Then drag out, position, and resize the rectangle in which the recording will take place, and finally, click Record.
However you start a recording, you can stop it in one of two ways. A stop button always appears on the menu bar; click it to finish and save the recording. On a smaller laptop screen, it’s possible for the menu bar button to be obscured, so here’s an alternative method: press Command-Shift-5 again, and the recording controls are replaced by a stop button.

You can record yourself speaking while you make a movie of what’s happening on the screen. To do that, open the Options menu and choose Built-in Microphone. Another special movie recording option is Show Mouse Clicks, which puts a dark circle around the pointer in the recording whenever you click.
That’s it! Mojave’s new screenshot and screen recording controls offer more options and are easier to use than the previous techniques, as long as you remember the Command-Shift-5 keyboard shortcut to bring them up. Practice that a few times, and you’ll be ready the next time you want to capture a funny dialog or strange occurrence on your Mac.
Social Media: Have a question about something that happened on your Mac? Take a screenshot or make a screen recording to help tech support! It’s easier than ever in macOS 10.14 Mojave.